Thursday, October 30, 2008

How Much Food is $700 Billion??

In the light of the recent stormy weather on the Global Financial front and the various knee jerk responses of governments around the world, reading this article on the SBS website gave me pause for thought. It seems astounding that $700 billion can be found 'just like that' to prop up a bubble of greed, when the far more alarming problems of global warming and food shortages could be all but solved with a fraction of that money.

To bring it all down to a human scale the SBS article (by journalist Phil Lees - creator of the Cambodian Food blog Phnomenon) crunches the numbers of the $700 billion corporate bailout down into bite sized chunks so we can picture exactly how much food that figure translates into - and how many starving people could be fed.

Here are some examples of what $700 Billion equals:
  • $700 Billion = 2000 good old American Apple Pies for every man woman and child currently living in the United States

  • $700 Billion = Dinner for the entire population of the top 5 most populated countries, at one of the world's most expensive restaurants: El Bulli in Spain could shout the entire population of China, India, USA, Indonesia and Brazil to dinner.

  • $700 Billion at the other end of the spectrum = the UN World Food Programme able to feed 86 million people for the next 23 years.
Like I said, Food for Thought...


This is a photo from the fresh-produce marketplace in Kota Bahru in northern Malaysia, 2007.

Wednesday, October 29, 2008

A Crop of Cumquats

Last weekend, I just had to get into the garden – it hadn’t had any attention for months and the springtime jobs of pruning and tidying were over-due. The cumquat trees especially needed a serious prune, to clear out the heart of the tree and get them ready to spark up with spring growth in coming months. I’d planted five of these trees in pots for Feng Shui reasons in the garden of my Natural Medicine clinic – the bright orange fruit are considered a symbol of luck and prosperity in Chinese landscape-design - and I have to say, I like a tree that self-decorates with cute orange baubles! Some of the branches that needed to be removed were laden with this golden fruit and I couldn’t be let them to go to waste.

So the question arose: what to do with a bowl full of Cumquats?

Consulting the Oracle (Google) produced numerous articles involving advice and recipes for dealing with a crop of cumquats, including:

Cumquat Marmalade: from Cooks Almost Everything
Candied Cumquats: from Morsels and Musings

Kumquat, Fennel and Blood Orange Salad: from Erins Kitchen
Kumquat Compote: from Seattle Bonvivant
Kumquat Salsa: from Garrett at Vanilla Garlic
Wickid Kumquatini Cocktails: from Wallflower Entertaining

But in the end, what really captured my imagination was a mention of:
Cumquat Curd I couldn’t find the actual recipe online – if no-one else is doing it, does that mean it’s a really good idea (that no-one in the Whole-Wide-World has thought of yet) or really a bad idea (that no-one in their right mind would even consider)?? - but the concept piqued my interest. So using my mum’s recipe for Lemon Butter, I juiced and zested my cumquats, reserving the skins to make into a pickle and here is the result:


The verdict? Cumquat Curd IS a really good idea - Yum-oh!

Cumquat Curd Recipe:
4 eggs
140g sugar
70g unsalted butter
2 tsp grated cumquat zest
120ml cumquat juice

Whisk egg yolks and sugar until well combined but not frothy.


Tip into a heavy-based non-reactive saucepan and add butter, zest and juice.

Stirring constantly, bring to simmering point over a medium-high heat (about five minutes).

As soon as bubbles appear, remove from heat, still stirring. Allow to cool. Transfer to sterilised jars and seal.

Makes 2 cups

Cumquat Pickle

I wanted a recipe that would make use of the skins of the cumquats after I had juiced them for making the cumquat curd.

Cumquats are unlike other citrus fruits, as the peel is less bitter than the flesh. They produce an excellent sweet-and-sour pickle, combined with palm-sugar, vinegar and spices.


Cumquat Pickle Ingredients:
250 g cumquat rinds
100 ml white wine vinegar
2 cardamom pods, crushed
1 cinnamon stick
1 cm piece of ginger, shredded
1 tsp sea salt
60g soft palm sugar
2 cloves
water

Cut the cumquat skins in half and put them in a saucepan with the salt and water to cover. Bring to the boil then simmer for 5 minutes. Drain the kumquats, discarding any pips.

Place the vinegar, palm sugar, cardamom pods, clove and the shredded ginger into a pan and heat gently, stirring, until all the palm sugar is dissolved. Raise the heat and bring to the boil, then add the pre-boiled, drained cumquat rinds. Simmer for one minute, then allow to cool slightly.


While the mixture is still medium-hot (about 75 degrees), ladle the cumquats and the liquid into warm, clean, pre-sterilized jars. Cover with non metal (ie vinegar-proof) lids and seal.

Store in a cool, dark, dry place for 1 month before using.

Cumquat Pickle is wonderful with Malaysian and Indian Curries.


Yum-oh!

Thursday, September 25, 2008

Naggy's Fork

As you know from my previous posts, I've been exploring of the art of cutlery - and here's the latest results of fiddling with my fork...

Sunday, September 07, 2008

Fatima's Fork


Waiting for friends to arrive at Fatima's Lebanese Restaurant on Cleveland Street Surry Hills and playing with my Canon IXUS pocket-camera... alas, no photos of the great food we were served, cos we were too busy chatting and eating when dinner arrived on the table, but it was definitely Yum-oh!

Sunday, August 31, 2008

Moroccan Lamb & Chickpea Broth

Barbara served up this delicious soup at a recent celebration of Tim's 'significant birthday' (one of those with an 'oh' in it...), while Tim's latest Jazz recording was playing in the background.


Tim and his friend John can be found early on any fine Tuesday morning, playing Saxophone and Double Bass outside Sydney's Central Station at the Elizabeth St entrance, before they both go off to work for the day. They were 'discovered' one recent morning by the manager of a recording studio and invited to cut the CD we were listening to, which I have to say sounds HOT! The CD will be available in the near future - I'll keep you posted when they release it. Knowing I live in a world where people still play great music in the streets for the love of it makes me - and a lot of other lucky Sydney-siders - feel filled with joy. Thanks Tim - and Happy Birthday!


This photo was taken by photographer Marc Burlace, for a Penguin Books street-theatre promo that was going on outside Central at the same time as Tim and John were playing, with three people dressed like 1930's characters handing out old Penguins to celebrate Penguin Books' birthday.


The recipe for Barbara's Morroccan Lamb and Chickpea Broth is a two-step, requiring some preparation the night before the day that you want to serve it.

The-Night-Before: Prepare the Lamb Broth
500g lamb neck
4 tablespoons olive oil
100g onion
100g carrot
100g leek
2 tablespoons cumin seed
4 sprigs of thyme

Brown the lamb neck in oil, adding the onion and cumin seed, frying until fragrant. Add the remaining vegetables and the thyme and cover with water, simmering two-and-a-half hours until tender. Cool and strain the broth, reserving the lamb-meat and the broth. Dice the meat into bite-sized pieces. Refrigerate the broth over night and skim off any fat the next morning.

Also, cook 2 cups chickpeas in boiling water until tender. Strain and cool, refrigerating until ready to make the soup the next day.

The Next Day: Cooking the Soup
250g onion
250g carrot
250g leek
1 tablespoon chopped garlic
1/1/2 tablespoons turmeric
2 tablespoons cumin
1/1/2 tablespoons coriander
1/2 tablespoon cayenne
2 litres of lamb stock
2 cups cooked chickpeas
juice of half a lemon
1/2 wedge of preserved lemon, rinsed of salt and slivered
salt and pepper to taste

Heat oil in a large soup pot and sweat the onions and garlic. Add the diced vegetables and stir-fry for 10 minutes. Add the spices and cook three minutes until fragrant, stirring to prevent burning. Add the lamb stock and simmer for 1 hour. Add diced lamb meat, slivered preserved lemon rind and chickpeas. When ready to serve, add lemon juice and season with salt and pepper to taste.


Yum-oh!

Monday, August 25, 2008

Hungry for Vegies!

This week I've developed a hankering for vegetables - can't get enough of them! IKU Wholefoods, the iconic Organic Vegan diner at 612A Darling Street Rozelle seemed the answer to my prayers. They also have shops in: Glebe, Darlinghurst, Waverly, Neutral Bay, several City stores and Bondi Beach - full of fresh, wholesome, lush Vegan food.

Their Gluten-free Vegan Lasagne is second to none!


Yum-oh!

Monday, August 04, 2008

Sydney Seafood School - Christine Manfield

When my sweet friends Ordette and Paul and Carol and Greg and Karen and Faith asked me what I wanted for my birthday earlier in the year, I said: "Please, no more THINGS! I've got more than enough 'stuff' - it's experiences that I treasure most..."
And their response was perfect: a gift voucher to the
Sydney Seafood School at the Fish Markets in Pyrmont.


So I had a look at the program for the year and the selection of fine chefs they have on rotation, settling at last on Christine Manfield. Her unique style of international cuisine was especially appealing to me - she has taught cooking and created exemplary restaurants in both Europe and Australia and h
er latest venture is Universal Restaurant, situated in East Sydney - at Republic 2 Courtyard in Palmer Street (between Burton and Liverpool streets) Darlinghurst 2010.

For bookings, Phone: 02 9331 0709.


The Seafood School class was excellent. Christine Manfield's presentation was very smooth and professional - as you'd expect from a chef of her calibre - and her good relationship with a great team of support staff was very evident. The kitchen auditorium and cooking stations were very well laid out - I think there were about 40 people in the class, but it didn't feel crowded at all. The demonstration took about two hours where Christine cooked each of the dishes, explaining the ingredients and methods, with a few tips and trade secrets thrown in. The demonstration kitchen in the auditorium had mirrors over the bench, so it was easy to watch all stages of the process clearly.


After the Demo, we progressed into the kitchen, forming groups of five around island benches dotted around a big open room, with each member of the group electing to cook one of the dishes, making enough for all five members.

Drum-roll pur-leeze! - here's what we made:

Garlic Saffron Mussel Soup


Oyster and Soba Noodle Salad


Palm Sugar and Green Mango Fish


Deep-Fried Fish pieces


Crab Fried Rice


Comprehensive notes and recipes were provided, so we can reproduce these gems at home.

When we had co-ordinated getting all dishes to peak at the same time, we proceeded to the dining room to enjoy the fruits of our labours. The dinner was complimented by a $100 bottle of fine champagne, which was lost on me as I don't drink alcohol - but they also had bottles of Perrier freely available.


In summary, I have to say the whole experience was an absolute delight - I can definitely recommend doing a class at the Sydney Seafood School - and THANK YOU to my beautiful friends for thinking of sending me on such a sumptuous experience!

Yum-oh!


Tuesday, July 29, 2008

A Smorgasbord of Dancers...

Apologies to the readers who want more recipes - there WILL be more in future, don't worry - but here's some more of the rich fare that has lately lured my eye away from the kitchen.

I consider it 'food for the soul'...!


My long-time friends Dr Richard James Allen and Dr Karen Pearlman of the Physical TV Company invited me to witness the next stage of their creative process, a documentary film about Dance called: Doesn't Fit into a Box, inviting me to take stills photographs during the filming.

Over the last few years, Karen has been doing some Post-Doctoral Research in the Dance-Film area through a Fellowship with an organisation called Critical Path, based in Rushcutters Bay in Sydney. Through that research she says she didn't so much come up with answers, but rather - as is often the way when delving deeper into things - discovered still more questions.

So in this stage of the documentary-making, Karen was posing her questions to a diverse range of professional dancers and choreographers, asking:


"Where does Dance come from?"

"Where does Dance go when it leaves you?"

- and the ultimate existential question -
"What is Dance for?"

It was fascinating to listen to the varied responses of the professional dancers and choreographers who were being interviewed. Their expertise ranged from classically trained ballet, to flamenco, to indigenous performance, to Japanese Butoh, to yoga and martial-arts, to contemporary experimental cross-media arts that weave movement and text and light and voice together into dance.

Sitting very still for 20 minutes at a time - not a pin may drop during filming! - over a twelve-hour day and focusing intently on the responses of these professional artists was an intense meditation that made me reflect on my own creative practice.

And I found myself coming up with my own responses to Karen's Questions:

"Creativity comes from the air;
through the crackling impulse of the thoughts and experiences we share with each other;
though the moments of inspiration that we scatter like seeds from our flowering;
through the enlightenment that the burning of our flame sheds around us...

When it passes through us, creativity continues -

in the lives we have touched, in the minds we have changed
- it goes back into the air.

And 'what is creativity for?'


- well, you might as well ask:


'what is breathing for?'..."

Here is the view out the window of the dance studio as dusk fell. It had rained heavily throughout the day, but as you can see, all clouds have a silver - or in this case golden - lining.


Yum-oh!

Monday, July 28, 2008

Out & About...

I've been a bit slack in the Food Photography department lately... not because I haven't been eating - there's still been plenty of yum-oh in the tum-oh - just no time to photograph it!

For the last few weekends my camera's gaze has lifted from the dinner table and my mind has been occupied elsewhere, captivated by learning a host of new technical skills, as well as embracing new photographic opportunities outside the kitchen.

Shooting in RAW has been one of the technical things I've been exploring, bringing an appreciable difference (I think?!) to the quality of my finished images.

Another has been getting hold of a new lens - the Zuiko 12-60mm wide-angle zoom, which has opened a whole new window on my photographic world.

I've also been shooting in a whole variety of fascinating and (gasp!) 'non-food' areas, such as: weekend travel, stills for a contemporary dance documentary, a Buddhist garden centre, a Catholic christening and promo shots for a pregnant yoga-teacher colleague... (you can see I'm a pluralist at heart!)

For now, here's a collage of some pics from a wintry day-trip to Shell Harbour, down near Wollongong on the South Coast of NSW, about an hour-and-a-half from Sydney.


And a cup of hot soy-milk with chocolate stripes on top - just to show I haven't entirely abandoned Food Photography!


Yum-oh!

Thursday, July 24, 2008

Learning New Presentation Skills

Today I learned some new presentation skills! So If you'll bear with me, here's a collage of some of the photos from Marienne's Zesty Citron Cake shoot...


This was done using the free software on Picassa from Google. Picassa is a great picture-organising tool, I don't know how I'd keep track of my pics without it - it's super-fast for browsing images and has some really good picture-editing tools. For some of the simple fixes - cropping / straightening / lightening / darkening / sharpening / saturation / etc - it is almost as good as PhotoShop and nowhere NEAR the mucking about.

Who said there's no such thing as a Free Lunch??! lol.

Thursday, July 10, 2008

Gluten-Free Spaghetti Pesce

A quick Tuna-Pasta for a week-night dinner...

Since discovering that living in a wheat-free world suited my system a lot better, I’ve spent a bit of time experimenting with the variety of alternatives that are available. In the early days of wheat-free products there was, shall we say, a LOT of room for improvement. The breads typically tasted like cardboard and the pastas often failed to hold their shape, turning into a watery glug.

But behold the advancements of the 21st Century! Wheat-free breads and pastas are now being produced which rival and even surpass their wheaten counterparts.


San-Remo make a beaut range of Spaghetti, Tagliatelle, Penne, etc, that hold up under all the usual pasta tests: they remain aldente when cooked, they hold the sauce well on the plate, and they taste great.


Here’s one of my week-night stand-bys - a quick and easy tuna-pasta with fresh herbs. It was so un-seasonally warm yesterday that a light pasta seemed just the thing – spring is definitely returning!


I grew these Rocket and Chicory herbs myself, in pots by the back door, using organic compost.


The recipe?

Spaghetti Pesce with Fresh Herbs

Ingredients:

1 packet of gluten-free spaghetti pasta,
1 can of dolphin-safe tuna in oil
1 large dollop of Organic soya mayonnaise

1 small red Spanish onion, finely sliced
a handful of fresh green herbs, shredded

(I used Rocket and Chicory, but basil, coriander, spinach, dandelion greens, etc, are also great)

Bring a large pot of water to the boil and cook the spaghetti until aldente - cooked, but with a slight firmness to the bite.

Drain most of the oil off the tuna and scatter it into a mixing bowl. Slice the Spanish onion finely and shred the green herbs and add them to the tuna. Add a dollop of mayonnaise to the tuna and herbs and mix through lightly.

On the weekend, you could make your own mayo from scratch, but for 'quick-and-easy', shop-bought organic does just fine.

When the pasta is cooked, drain it and place in a serving bowl. Top with the tuna mix and fold it though with a couple of large forks. Serve immediately with a sprinkle of freshly ground pepper.

Yum-oh!

Tuesday, July 08, 2008

Beth’s Four-Flours Gluten-Free Bread

Last Sunday morning, Beth cooked up a fabulous breakfast to celebrate Audrey handing in the final copy of her thesis - remember Audrey? She has been writing about the Sarawak cloth-weavers and she made us that delicious Laksa and the Mohinga Fish Soup.

The piece-de-resistance of Sunday’s breakfast was, in my opinion, the Four-Flours Bread that Beth made from scratch, with her own special combination of gluten-free flours. It was absolutely yum-oh: it toasted well and harmonised perfectly with poached eggs, fried mushrooms and spinach & fennel.


Here’s Beth’s Secret Recipe:

Four-Flour Bread Ingredients for a 1 kg loaf.

Wet ingredients:
water 400 ml
olive oil 3 tbs
sea-salt 2 tsp
maple syrup or carob molasses 2 tbs
soy milk 2 tbs

Dry ingredients:


Mix these four following flours together:
- Besan (chickpea) flour 1 cup
- Buckwheat flour 1 cup
- Brown rice flour 1 cup
- Potato starch 1 cup


With:
- 2 tbs xanthan gum
- 2 tsp batatis rhizome powder (Shan Yao - Wild Mountain Yam)
- 2 tsp Tandaco yeast

Seeds/Grains to be added later:
- 2 tbs linseeds
- 2 tbs kibbled oats


Directions for Bread-maker:
Beth uses a Breville Baker's Oven: Electronic Bread Maker (model BB280) that she bought from the Breville Factory Outlet in Ultimo, near the Sydney Fish Markets. She says it was a cheap one that she bought just to see if she was really 'into' bread-making. And now that she knows she really IS into bread-making (!) she says she will probably upgrade sometime to a model with a retractable blade, as the BB280 blade leaves a hole in the bottom of the loaf.


Add ingredients in the given order above, wet ingredients followed by dry, making sure that the yeast is the last one in. Set to Basic Bake (2 hours), with preferred crust setting.

The machine will take off and start mixing all the ingredients, letting them 'rest' for the appropriate times for the yeast to rise etc. You can watch if you want through a little window in the top - great for entertaining the kids on a rainy day (or is that only pre-Nintendo kids?) - when the blade starts kneading, the dough comes together in a ball and it is like watching a fat hamster scurrying around the barrel.

After the second rising (about 20 minutes) the bread maker will beep and you add the grains, mixing them into the dough for a more even spread.
Fancier model bread-makers have an auto function for adding seeds at this stage - you put them in a little chamber and they are released at the appropriate time.

Then it's a matter of putting your feet up and waiting for the house to be filled with that oh-so-delightful smell of fresh baking bread.

In a later post, we will investigate the traditional 'made by hand' bread method. My friend Stevie in Newcastle is a dab hand at bread, having made fresh, crusty loaves for his family of six for years. He knows his way around both the hand-kneading processes, as well as several bread-making-machines. Look out Steve - the bloggstudio is coming!!

Beth was saying yesterday that she is keen to try making a gluten-free Pizza base that the Breville instruction book says can be made in the bread-maker.

Mmmmmm - Yum-oh!

Mohinga – Burmese Fish & Noodle Soup.

I was Googling 'breakfast' the other day, to do a little compare-and-contrast of what the rest of the world is tucking into as the sun rises. And the strange proclivity that many modern westerners have for either cold cereal or a greasy fry-up is, it seems, mostly a marketing invention of one Harvey Kellogg, who at the turn of the last century wanted to find a way to sell corn and sugar in a more appealing way; and a hang-over from the English farmers' breakfast where a solid meat meal would keep a man hard to the plough all morning.

My own personal taste in breakfasts leans much more towards the East in general, and Asian soups, congees and dumplings in particular. It is nice to know I am not alone in this desire - 80% of the worlds population dream of this kind of thing for breakfast. So you can imagine my delight when I discovered Mohinga - Myanmar's classic breakfast meal - which could be considered the national dish of Burma. Frequently served up by mobile street-hawkers as the early rays of sun break into the day, the soup-base is cooked the previous night and is served piping hot, poured over noodles and topped with garnishing ingredients that are all carried in two baskets hanging from a bamboo pole balanced across the Mohingar’s shoulders.

Since this food photography project first began, I have been rounding up my friends to act as Food Stylists - and when I mentioned this Mohinga concept to Audrey and Howard, they were keen on collaboration. As it happens, this was one of our first shoots, but it's taken me until now to get around to posting it. As you can see, I didn't know much about my new camera then, so the depth of field is a bit 'atmospheric', but I think you can get the idea - the finished dish was delish!


A little note of editorial authenticity:
I ran into Enid, a Burmese woman I met through my friend Beck and told her we had been cooking Mohinga. She agreed the recipe was authentic (no coconut milk, please, we're Burmese!) but she corrected our use of bean-sprouts that you will see in the photo, because these aren't traditionally used in garnishing Mohinga. I guess we had been borrowing that Idea from Laksa...


Mohinga Ingredients:

1 cup yellow-split-peas
2 cups water - boil 12 minutes

500 grams dewfish (or other white fish)
cut into bite-size pieces & tossed with:
1 teaspoon salt
1 teaspoon turmeric powder

½ cup long grained rice, dry fried for 5 min in a heavy based pan, stirring continuously until a golden colour and nutty aroma arise. Grind to a powder in a mortar and pestle.

¼ cup peanut oil or rice-bran oil
1 stalk of lemongrass, with the bulb
2 large onions, grated
6 cloves garlic, chopped
2-inch piece of ginger, peeled & grated
1 small lotus root, peeled and sliced
1 tablespoon paprika
1 teaspoon freshly ground black pepper
¼ cup fish sauce (nam pla / ngoc mam)
4 cups water

1 packet of dried rice noodles
Boiling salted water to cook noodles - 5 min

Garnishes:

3 hard boiled eggs, quartered
a bunch of coriander leaves
1 cup sliced bamboo shoots
3 shallots/spring onions, sliced finely diagonally
2 limes, quartered
1 teaspoon cayenne powder

Cha Ca - Fried Fish:

1 fillet of Ling, cut into bite sized pieces.
1 teaspoon turmeric
¼ teaspoon salt
oil for shallow-frying


Method:

Heat the oil in a large pot and add the onions and fry over low heat until they turn golden, about 5 minutes. Pound the lemongrass stalk lightly to release flavours. Add the marinated fish, garlic, lemongrass, ginger, lotus root, paprika, black pepper and fish sauce to the onions and cook, uncovered, over medium heat for five minutes.

Add the boiled split-peas, the extra water and rice powder and stir well. Bring to a boil, lower the heat, cover and simmer for 12 minutes.

Prepare the garnishes, setting them out on platters for diners to choose from. Boil the rice noodles for 5 minutes and drain. In a separate frying pan, fry the Cha-Ca turmeric-fish pieces until crisp and golden outside and tender and juicy inside.

To Serve:

Place the fish soup stock in a serving pot in the centre of the table, along with the platters of garnishes, Cha-Ca fried fish and the cooked rice noodles. Diners should fill their soup bowls first with noodles, then with the fish curry and whatever garnishes they wish to add before tucking in.

Yum-oh!
Sunday, June 29, 2008

Zesty Citron Cake - gluten-free

At the risk of looking like I've developed an obsession with lemons, here's a delicious, zesty, gluten-free cake cooked by my friend Marienne, who is off to the south of France in two days time. Bless her, she thought I was just coming over for a cuppa and a chat and maybe take a few snaps of the finished cake she was planning on making, before we boxed it up to take to Regina and David's the next day... *chuckle*

Words to the wise: beware of inviting a blogger over for an afternoon of cake-making, he he he.... In the end, Marienne coped admirably with me turning her lounge-room into a photographic studio - lights, camera, action! Her hands over-came their camera shyness and she was very patient while I practiced my 'document the steps' process... I can tell you now, those people who make step-by-step photographs for magazines and cook-books are legends!! Juggling the attention to detail on the 'set', while keeping the actual cooking process on schedule is quite a task.

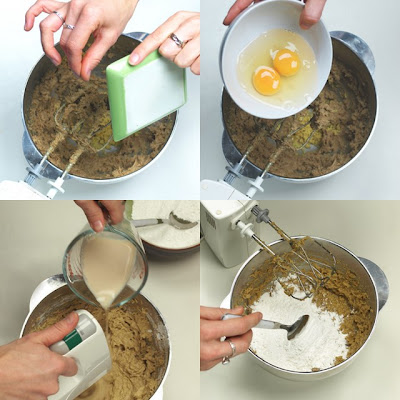
So here's my first attempt at step-by-step documentation:


zest and juice the lemons...


cream the butter and rapidura sugar...


beat in the zest and eggs...


whisk in the milk and fold in the flour...


stir in the lemon juice and pour into a lined cake tin...
bake at 180 degrees C for 30 - 45 minutes...


when baked, remove from oven and cool on a wire rack. Prick all over with a fork and pour the citron-syrup evenly over the cake, allowing it to soak in.


And the recipe?

Marienne's Zesty Citron Cake: (gluten-free)

Ingredients:
150g unsalted butter
175g rapidura (dried sugar-cane juice)
2 eggs
grated zest of 1 lemon
1/2 cup almond meal
125ml soy or cow milk
60g sticky-rice flour
115g rice flour
3 teaspoons baking powder
juice of 1/2 lemon

Lemon Syrup:
100g icing sugar
100ml lemon juice (1/1/2 lemons)


Method:
Cream butter and sugar until light and fluffy. Add lemon zest and eggs and whisk in. Add milk and almond meal and whisk through. Sift flours and the baking powder together and gently fold in to the cake mix. Do not beat much at this stage, as you don't want to 'toughen' the mix or lose its airiness. Fold through the lemon juice and pour immediately into a greased and lined cake tin. A spring-form tin is easiest for removal after baking.

Bake 30-45 minutes at 180 degrees C.

While the cake is baking, prepare the citrus syrup - place icing sugar and lemon juice in a saucepan and cook over a gentle heat, dissolving the icing sugar, but do not boil.

When the cake is golden on top and a skewer comes out clean when tested, remove from oven and cool in the tin on a wire rack.

Prick the cake all over with a fork and pour the citrus syrup evenly over the cake, allowing it to soak in.

Remove from tin and serve immediately, or store in a sealed container over night.

Yum-oh!


LinkWithin Related Stories Widget for Blogs